Monday, January 16, 2012

go where you'd like to go

Those are the infamous words I hear nearly everyday in yoga... code for: try to take your pose to the next level. If your arms are "twisted like ropes" for eagle, "going where you'd like to go" can mean bringing your leg up and over the other leg and wrapping your toes around your calf. If you are in tree, "going where you'd like to go" can mean raising your arms to the sky instead of leaving them at heart-center. Of course, nobody around you is judging whether or not you go for it but you know whether you've pushed yourself or not.

When I started this blog, it was a way to showcase my creative talent. I had two months to myself without worrying about grading papers or lesson planning. I could paint, craft, bake and blog as much as I wanted. However, as you've noticed, the end of July came and I gave up. Sure, I've painted occasionally and baked hundreds of cupcakes since that time. But, taking pictures of the crafts and posting to the blog just took a backseat to everything else I had going on.

You see, in May & June of 2011 I started feeling super sick all the time and found out that I had pretty severe acid reflux {gross, sorry}. I guess eating buttercream icing with a spoon everyday finally caught up to me. I went on medicine for it for about a month but in an effort to get off the meds, I started changing my diet. I also knew I needed to get in shape.

I went to Pure Barre- a hybrid of ballet/pilates/yoga- the end of June thanks to a LivingSocial coupon and became slightly obsessed. I started going to class nearly six times per week. In addition to not eating chocolate or tomatoes {due to acidity}, I was on a roll with getting myself healthy and back to normal.

August came and school started back. I worked out, went to work, and then coached cheerleading afterwards. At the end of the month, I started going to hot yoga in the evenings.

I am proud to say that six months later, I am still working out twice per day most days, teaching, and coaching. But, now I want to add the blog back into my schedule. However, I'm going to be utilizing it in a different way.

"Going where I'd like to go" with the blog means writing about what I'm most passionate about. I don't have time to do crafts everyday or even every weekend. Yes, I still bake cupcakes for those of you who are concerned. Yes, I will still post pictures of those things that I do create, but I will also post about topics that I hope inspire you and teach you something new. I plan to do a lot more DIY posts so you can channel your inner craftiness but also post about the things that inspire me in an effort to hopefully encourage you to go out and reach your goals.

I hope you'll join me in this new journey. I leave you with a painting that I did over Christmas to hang above our stove. It serves as a great reminder to me of the character traits that I am able to {and called to} show others daily because of Jesus being in my heart.

2012 is already off to a great start. I look forward to sharing the year with you. Happy MLK Jr. Day!

Saturday, July 23, 2011

isaiah 52:7

How beautiful upon the mountains are the feet of him who brings good news, who publishes peace, who brings good news of happiness, who publishes salvation, who says to Zion, "Your God reigns."


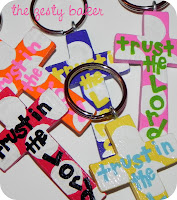
When I first started making the monogrammed ball keychains last month, I was showing Tiffany pictures of them and she made a passing comment about cross keychains. Of course, this made my mind start wandering and I could not help but try it out. So, I started by making her a keychain {hey, if you think of the idea, you should get it free right?}


Tiffany loved hers so much that she has since ordered nine additional cross keychains from me.

One for a birthday present to one of her best friends.


Five for her college girlfriends {they do a girls trip every year and she always takes a little something for each of them}.


And, most recently, three for her daughters' cheerleading camp coaches.


They are such a blessing to make because not only am I painting and doing something I love, but I am spending time in the Word finding verses that would encourage others' hearts every time they pull out their keys to drive or unlock their house. 

Speaking of keychains, Lindsey and Megan {winners of the most recent giveaway} received their packages about two weeks ago with their monogrammed ball keychains and magnets. They have both emailed me that they received them and I hope they enjoy them.


Can you tell I'm in to painting polka dots right now? :)

Painting aside, this weekend I'll be back in the kitchen baking up twelve dozen mini cupcakes to take to lunch for the Elon Law School students as they take the Bar next Tuesday/Wednesday. They've requested s'mores, vanilla, and chocolate chip. Yum!

I also should say that I am attempting rock climbing today with Ford... I don't know what kind of project that is going to inspire for me, but it's gotta be something. I'll let you know how it turns out. Happy Saturday!

Sunday, July 10, 2011

cupcake baking extravaganza

Just looked at the date on this post and realized it is officially my half-birthday.

I wasn't planning on this post being in honor of my half-birthday, but sometimes you have to find an excuse to bake {and eat} cupcakes ALL week long.

Earlier this week, I created a new recipe all by myself.

Okay. Wait. I probably should rephrase: I changed a recipe that Jil originally created, all by myself, for the first time. I didn't even call her. Not once! Not until it was over and tasted. Woohoo!

I call this creation the Jen Bomb Cupcake.


The flavors of this cupcake were inspired by a Shirley Temple drink with vodka added to the buttercream. When vodka is added to a Shirley Temple, it is apparently called a "Dirty Shirley" {yes, I did research on this}. But, when my sister Jennifer was in college, she would mix herself some Sprite, grenadine & vodka when she would go out and she named her version of the drink the "Jen Bomb" so I felt it was only appropriate to name the cupcake in honor of her.

Next, I made a S'mores Cupcake.


I had been thinking about this cupcake for a while and looking at several recipes online. Some of them looked super complicated and not worth the effort, and some of them looked like they may not have the true taste of s'mores that I was trying to accomplish. So, I pulled some things I liked about each one and made my own.

I did call Jil. Once. Just to confirm my suspicions how I should make marshmallow buttercream... :)


This delicious cupcake has three main layers: graham cracker crust, chocolate chocolate chip cake, and a marshmallow buttercream icing. Of course, considering a s'more has two layers of graham crackers, I dusted some of the bits on top as well.

Finally, when I went to take Jil a taste of my s'mores cupcake today, she decided that we should bake some Raspberry Champagne Cupcakes.


I love berry-flavored buttercream icings. This particular one has got to be my absolute favorite. Nothing like fresh raspberries, sugar and butter with a chilled glass of raspberry champagne to wash it down.

Tomorrow morning I am taking the last of my s'mores cupcakes to Elon University for the law students to enjoy while they continue studying for the Bar. Then, I think I need to take a little break from the kitchen just long enough to catch up on the dishes and let all of this sugar digest :)

With all these new recipes tested and enjoyed, I'd love to make cupcakes for a special event you have coming up. My first large order is planned for September when I will be making 125 cupcakes for NCSU Tri Delta's Preference Night. I'm so excited to be able to bake for my sweet sorority sisters and feel honored that I was asked to help during Recruitment.

If it's cakes or decorated cookies you are looking for, make sure you check out Award Inspirations and see how Ashley can help you.

Tuesday, July 5, 2011

simple silhouette

On May 23, 2010, little Cameron made his appearance into the world. His mommy is one of my sister's best friends and has been like a sister to me since I was in high school.

I was so excited when my {real} sister asked me to make a silhouette of precious Cameron for his first birthday.


Before I go any further with this post, you should probably know that I pronounce his name "Cam'ron"... as in the rapper from ten years ago... So, as I type his name each and every time, that is what I'm thinking to myself {and now you probably are too}. I've always had a habit of making nicknames for people.

You may remember that I did a silhouette of my sweet Mally May a few months ago, just for practice. That time, I chose to use patterned paper and this time I opted for a simpler look. More Pottery Barn-esk if you will. 


My favorite part of this silhouette is his little double chin :) Everything about his little eye lashes and lips and chin are so innocent... I love it!

On the back of the frame, I wrote Cameron's full name and how old he was at the time of the silhouette {1 year}. It's great to have personalized wall art that actually carries significance to you in your home.

Happy belated birthday, Big C! Here's to many, many more birthdays for you my friend. I promise I will get started on your growth chart long before your next birthday... ;)

Monday, July 4, 2011

painted cookies

We just got back in town from a whirlwind trip to Kentucky for Ford's mom's family reunion. Everyone gets together once a year for three days to hang out, play golf, eat lots of food and enjoy one another's company.

This year, I commissioned Ashley {Award Inspirations} to make me two dozen square sugar cookies topped with lemon flavored royal icing to take to the reunion. My request was a simple one because I had big plans to paint the cookies with food coloring. I was not sure that I'd be able to make the cookies myself in time to let the icing harden before I could paint them {I'm not the most patient person ever}, so she graciously agreed.

Here's how they turned out...


On all twenty-four cookies, I painted different designs, pictures, and variations of "Pryor Reunion 2011."

The hardest part was the fact that when I researched how to paint on royal icing, I found that most use a liner brush {it is very small and thin} but I typically always use larger brushes, so even holding the smaller brush took some getting used to. I ended up getting three different brushes and I'm sure you can tell from the picture when I would use a liner brush and when I would use a thicker brush.

If you are interested in painting on cookies, this is what you need:

  • sugar cookies with royal icing {hardened over night}
  • AmeriColor gel food colors
  • new paintbrushes
  • water {optional}


Squeeze the AmeriColor gel onto a paper plate or new plastic paint tray. Add just a drop or two of water to the gel {optional} to create a watercolor-like palate. Then paint, cleaning your brush in a cup of water in between each different color you use.

It's really very simple and a fun alternative to painting on canvas. I think it would be great for kids to do as well. Just a sidenote though: while you can freeze sugar cookies and royal icing, I do not recommend freezing the painted cookies because the colors tend to run after you take them out of the freezer and they have collected moisture.

Of course, since I didn't actually bake the painted cookies, I felt like I needed to live up to my new last name and bake some homemade cupcakes to take to the reunion as well.


Almost all of the six dozen mini cupcakes made it to Kentucky, but of course my aunt and uncle had to taste-approve them when we stopped at their house during our trip :)

I made double chocolate chip cupcakes with vanilla buttercream icing this time, but during the ten hour car ride I had the chance to sketch out a few new recipes that I am very anxious to try out this week.

Overall, it was a great weekend, even if it went by too fast. We had a great time and are probably going to need to go on sugar-detox for the next month... Happy 4th!

Saturday, June 25, 2011

margarita cupcakes


For Cinco de Mayo this year, Jil and I whipped up some Margarita cupcakes {okay, really I was just the lime cutter}.

I was not a big fan of the idea of Margarita cupcakes at first. Probably because I don't like drinking Margaritas. AND I do not like limes... or any citrus fruit.

I should have gone with my instinct that I would not like these cupcakes and never tried one. It would have saved me many, many calories. Apparently when there is butter and sugar mixed with the tequila and lime, I have no problem with either one.

Well, I got a call from Julia, who needed a few dozen mini cupcakes for her sister's "Stock the Bar" wedding shower/party tonight. I gladly agreed to bake for her and we both decided that Margarita cupcakes would be perfect for the theme of the evening.


Julia, I hope the cupcakes are as delicious as they smelled baking and that you guys have SO much fun at the party tonight.

Next thing I'm going to try are Lemon Drop Martini cupcakes... anybody want to volunteer to do some taste-testing in a couple of weeks?? :)

Friday, June 24, 2011

double giveaway winners

I am so excited to announce the winners of the keychain & magnet giveaway!

Lindsey


Megan


Congratulations to you both. Be sure and check your email today so I can find out how to get your keychains and magnets to you :)

To everyone who entered, thank you for your support of the items I create! You know another giveaway of some sort will happen before the end of summer {because I love giving things away} but for now, if you'd like to purchase a keychain {I'm in the process of working on cross keychains as well and they are looking SO cute... I'll post a picture soon} or magnets, be sure and send me an email!