Saturday, July 23, 2011

isaiah 52:7

How beautiful upon the mountains are the feet of him who brings good news, who publishes peace, who brings good news of happiness, who publishes salvation, who says to Zion, "Your God reigns."


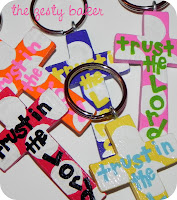
When I first started making the monogrammed ball keychains last month, I was showing Tiffany pictures of them and she made a passing comment about cross keychains. Of course, this made my mind start wandering and I could not help but try it out. So, I started by making her a keychain {hey, if you think of the idea, you should get it free right?}


Tiffany loved hers so much that she has since ordered nine additional cross keychains from me.

One for a birthday present to one of her best friends.


Five for her college girlfriends {they do a girls trip every year and she always takes a little something for each of them}.


And, most recently, three for her daughters' cheerleading camp coaches.


They are such a blessing to make because not only am I painting and doing something I love, but I am spending time in the Word finding verses that would encourage others' hearts every time they pull out their keys to drive or unlock their house. 

Speaking of keychains, Lindsey and Megan {winners of the most recent giveaway} received their packages about two weeks ago with their monogrammed ball keychains and magnets. They have both emailed me that they received them and I hope they enjoy them.


Can you tell I'm in to painting polka dots right now? :)

Painting aside, this weekend I'll be back in the kitchen baking up twelve dozen mini cupcakes to take to lunch for the Elon Law School students as they take the Bar next Tuesday/Wednesday. They've requested s'mores, vanilla, and chocolate chip. Yum!

I also should say that I am attempting rock climbing today with Ford... I don't know what kind of project that is going to inspire for me, but it's gotta be something. I'll let you know how it turns out. Happy Saturday!

Sunday, July 10, 2011

cupcake baking extravaganza

Just looked at the date on this post and realized it is officially my half-birthday.

I wasn't planning on this post being in honor of my half-birthday, but sometimes you have to find an excuse to bake {and eat} cupcakes ALL week long.

Earlier this week, I created a new recipe all by myself.

Okay. Wait. I probably should rephrase: I changed a recipe that Jil originally created, all by myself, for the first time. I didn't even call her. Not once! Not until it was over and tasted. Woohoo!

I call this creation the Jen Bomb Cupcake.


The flavors of this cupcake were inspired by a Shirley Temple drink with vodka added to the buttercream. When vodka is added to a Shirley Temple, it is apparently called a "Dirty Shirley" {yes, I did research on this}. But, when my sister Jennifer was in college, she would mix herself some Sprite, grenadine & vodka when she would go out and she named her version of the drink the "Jen Bomb" so I felt it was only appropriate to name the cupcake in honor of her.

Next, I made a S'mores Cupcake.


I had been thinking about this cupcake for a while and looking at several recipes online. Some of them looked super complicated and not worth the effort, and some of them looked like they may not have the true taste of s'mores that I was trying to accomplish. So, I pulled some things I liked about each one and made my own.

I did call Jil. Once. Just to confirm my suspicions how I should make marshmallow buttercream... :)


This delicious cupcake has three main layers: graham cracker crust, chocolate chocolate chip cake, and a marshmallow buttercream icing. Of course, considering a s'more has two layers of graham crackers, I dusted some of the bits on top as well.

Finally, when I went to take Jil a taste of my s'mores cupcake today, she decided that we should bake some Raspberry Champagne Cupcakes.


I love berry-flavored buttercream icings. This particular one has got to be my absolute favorite. Nothing like fresh raspberries, sugar and butter with a chilled glass of raspberry champagne to wash it down.

Tomorrow morning I am taking the last of my s'mores cupcakes to Elon University for the law students to enjoy while they continue studying for the Bar. Then, I think I need to take a little break from the kitchen just long enough to catch up on the dishes and let all of this sugar digest :)

With all these new recipes tested and enjoyed, I'd love to make cupcakes for a special event you have coming up. My first large order is planned for September when I will be making 125 cupcakes for NCSU Tri Delta's Preference Night. I'm so excited to be able to bake for my sweet sorority sisters and feel honored that I was asked to help during Recruitment.

If it's cakes or decorated cookies you are looking for, make sure you check out Award Inspirations and see how Ashley can help you.

Tuesday, July 5, 2011

simple silhouette

On May 23, 2010, little Cameron made his appearance into the world. His mommy is one of my sister's best friends and has been like a sister to me since I was in high school.

I was so excited when my {real} sister asked me to make a silhouette of precious Cameron for his first birthday.


Before I go any further with this post, you should probably know that I pronounce his name "Cam'ron"... as in the rapper from ten years ago... So, as I type his name each and every time, that is what I'm thinking to myself {and now you probably are too}. I've always had a habit of making nicknames for people.

You may remember that I did a silhouette of my sweet Mally May a few months ago, just for practice. That time, I chose to use patterned paper and this time I opted for a simpler look. More Pottery Barn-esk if you will. 


My favorite part of this silhouette is his little double chin :) Everything about his little eye lashes and lips and chin are so innocent... I love it!

On the back of the frame, I wrote Cameron's full name and how old he was at the time of the silhouette {1 year}. It's great to have personalized wall art that actually carries significance to you in your home.

Happy belated birthday, Big C! Here's to many, many more birthdays for you my friend. I promise I will get started on your growth chart long before your next birthday... ;)

Monday, July 4, 2011

painted cookies

We just got back in town from a whirlwind trip to Kentucky for Ford's mom's family reunion. Everyone gets together once a year for three days to hang out, play golf, eat lots of food and enjoy one another's company.

This year, I commissioned Ashley {Award Inspirations} to make me two dozen square sugar cookies topped with lemon flavored royal icing to take to the reunion. My request was a simple one because I had big plans to paint the cookies with food coloring. I was not sure that I'd be able to make the cookies myself in time to let the icing harden before I could paint them {I'm not the most patient person ever}, so she graciously agreed.

Here's how they turned out...


On all twenty-four cookies, I painted different designs, pictures, and variations of "Pryor Reunion 2011."

The hardest part was the fact that when I researched how to paint on royal icing, I found that most use a liner brush {it is very small and thin} but I typically always use larger brushes, so even holding the smaller brush took some getting used to. I ended up getting three different brushes and I'm sure you can tell from the picture when I would use a liner brush and when I would use a thicker brush.

If you are interested in painting on cookies, this is what you need:

  • sugar cookies with royal icing {hardened over night}
  • AmeriColor gel food colors
  • new paintbrushes
  • water {optional}


Squeeze the AmeriColor gel onto a paper plate or new plastic paint tray. Add just a drop or two of water to the gel {optional} to create a watercolor-like palate. Then paint, cleaning your brush in a cup of water in between each different color you use.

It's really very simple and a fun alternative to painting on canvas. I think it would be great for kids to do as well. Just a sidenote though: while you can freeze sugar cookies and royal icing, I do not recommend freezing the painted cookies because the colors tend to run after you take them out of the freezer and they have collected moisture.

Of course, since I didn't actually bake the painted cookies, I felt like I needed to live up to my new last name and bake some homemade cupcakes to take to the reunion as well.


Almost all of the six dozen mini cupcakes made it to Kentucky, but of course my aunt and uncle had to taste-approve them when we stopped at their house during our trip :)

I made double chocolate chip cupcakes with vanilla buttercream icing this time, but during the ten hour car ride I had the chance to sketch out a few new recipes that I am very anxious to try out this week.

Overall, it was a great weekend, even if it went by too fast. We had a great time and are probably going to need to go on sugar-detox for the next month... Happy 4th!

Saturday, June 25, 2011

margarita cupcakes


For Cinco de Mayo this year, Jil and I whipped up some Margarita cupcakes {okay, really I was just the lime cutter}.

I was not a big fan of the idea of Margarita cupcakes at first. Probably because I don't like drinking Margaritas. AND I do not like limes... or any citrus fruit.

I should have gone with my instinct that I would not like these cupcakes and never tried one. It would have saved me many, many calories. Apparently when there is butter and sugar mixed with the tequila and lime, I have no problem with either one.

Well, I got a call from Julia, who needed a few dozen mini cupcakes for her sister's "Stock the Bar" wedding shower/party tonight. I gladly agreed to bake for her and we both decided that Margarita cupcakes would be perfect for the theme of the evening.


Julia, I hope the cupcakes are as delicious as they smelled baking and that you guys have SO much fun at the party tonight.

Next thing I'm going to try are Lemon Drop Martini cupcakes... anybody want to volunteer to do some taste-testing in a couple of weeks?? :)

Friday, June 24, 2011

double giveaway winners

I am so excited to announce the winners of the keychain & magnet giveaway!

Lindsey


Megan


Congratulations to you both. Be sure and check your email today so I can find out how to get your keychains and magnets to you :)

To everyone who entered, thank you for your support of the items I create! You know another giveaway of some sort will happen before the end of summer {because I love giving things away} but for now, if you'd like to purchase a keychain {I'm in the process of working on cross keychains as well and they are looking SO cute... I'll post a picture soon} or magnets, be sure and send me an email!

Thursday, June 23, 2011

double giveaway

I'm not one to post twice in a day, but in all fairness I went to sleep after posting the last entry early this morning... so technically it's a new day to me even if the date on here does not reflect that.

I wanted to go ahead and get this giveaway up because it's going to have a quick turnaround. Like, one day only. In other words, go ahead and comment and then come back and read about what you could win.


Last week, Award Inspirations held a keychain giveaway. Ashley sews, so she was giving away an adorable monogrammed ribbon keychain. I don't sew (yet, anyway) but I do paint.

Despite being able to make awesome keychains herself, Ashley had been talking about buying a new ball keychain because hers was all scratched up and she said it was so helpful in finding her keys in her big "Mary Poppins" purse. Well, I knew I could make them I just needed to find all the right materials. Seeing as how we always "trade" our crafts, I knew she'd make me a ribbon keychain if I could figure out how on earth to make this ball keychain.

Luckily, after trips to Home Depot and Michaels, I had found everything needed to make them. I had all of the supplies, so there was no way I was only making one. That's where you, my fabulous friends and followers, come in.


I have two keychains to give away this time. Yes, two of you will be getting a personalized, hand painted keychain in the mail next week. 


And, I'm not stopping there. Nope. 

A keychain? Sure, it's a great prize. 

But a keychain with a side of personalized magnets? Yes, please. Both winners of the keychains will each be getting a set of six monogrammed magnets {or you can opt for something other than your monogram- like a last name or first name}.


Here's how to win {you can enter twice}:

1. Become a follower {upper left hand corner; if you don't have a google email address, you can create a google ID and it's useful for more than just blog reading} and leave me a comment letting me know. If you are already a follower, leave me a comment and let me know that too :)

2. Post this giveaway to your Facebook, Twitter or blog and post a separate comment letting me know that you did so. 

Make SURE you put your email address in your comment.

I will be choosing the two lucky winners tomorrow {Friday} at 12pm EST.

wednesday night bible study

Ford and I had the most fabulous marriage counseling experience ever. We love our pastor and the advice he had for us. We loved the "homework" he would assign because it really got us talking and understanding one another on a deeper level.

Recently we've started a little accountability group with John and Ashley {of Award Inspirations}. We are meeting once a week and doing a short couples' study together about communication within marriage. We are switching off meeting at one another's homes and eating dessert together while we study the Word.

We started last week at the Wards' house, were Ashley served warm, homemade chocolate chip cookies and cookie dough ice cream {our favorite dessert from Fox & Hound}... it was so delicious. AND, just as a little plug for my sweet friend, Ashley sells her treats, so if you are interested in decorated cookies or cakes, make sure you check out her blog!

This week, since we were meeting at our place, Ashley requested to try the cake mix cookies. I mixed it up a bit and tried making the cookies with a chocolate cake mix and they were SO good. I personally think they were better than the yellow cake mix ones, but Ford says it's a tie. If you haven't made these cookies yet, I posted the recipe a few weeks ago and you should definitely try them out. You hardly even dirty any dishes in the process, which is shamelessly my favorite part... :)


As we've been discussing the importance of having genuine, honest, respectful communication, we have talked about how to do so in a constructive manner. One of the ways our pastor advised communicating effectively when both people have strong {probably opposing} opinions is to "Pass the Pen."

When you have the pen, you may speak. When you are finished, you pass the pen to your spouse. Your spouse must then repeat what you said, and then state their side. You have to continue doing this until the situation is resolved {pass, repeat what the other said, state your side}. It is so helpful because it causes you to really, truly listen to what the other person is saying and not just scheme what you are going to say next.

We told John and Ashley about this method, and we, as a group, decided that J & A would make me & Ford an object to pass and we would make them an object to pass. Well, Ford and I were being silly and came up with the "Argument Loofah." I don't even want to get into my history with loofahs {but if you knew me freshman year of college, you would understand that statement} but it just seems like something that screams conflict to me {again, you'd have to know me}.


I hope that you will be encouraged this week to work on your communication with those that you are closest with. It is amazing how much less arguing you do when you are being open and honest but also listening with respect for the other's feelings.

COMING UP THIS WEEK: Another GIVEAWAY! Get excited :)

Monday, June 20, 2011

give me s'more

With tomorrow being the first official day of summer, I thought I'd dedicate today to my favorite summertime treat: the s'more. I love everything about it... the simplicity, the deliciousness. Plus, the fact that it can be made in less than 30 seconds in the microwave makes it an instant favorite for anyone with a sweet tooth and not a lot of time to spend in the kitchen.

I had my first s'more of the season this past weekend while I was staying with my girls. We found great new s'more-making products at Target and were excited to try them out.

We had a long day at the pool...


But there was a storm coming so the girls all took quick showers while at the pool and as soon as we got home we all put on our pajamas and were ready for a slumber party complete with s'mores to eat and nail polish for manicures.


I think it's safe to say that the s'mores were enjoyed by everyone but Mally especially loved them.


I also took graham crackers, chocolate bars and marshmallows to my sister (who is studying for the Bar this summer) so that she could make s'mores in her microwave when she needs a little sweet treat. I got a text from her this morning that said she wasn't sure how long the ingredients were going to last... :)

Here's all you need to celebrate the first day of summer with a s'more:


Honey Maid Fresh Stacks Honey Grahams- these are the best because they are just the graham cracker squares and are in packs of 8 squares so that you don't risk having a whole stack of full-sized graham crackers go stale before you eat them all. Also, you don't have to worry about breaking the graham cracker in half (which is always challenging to get perfect).


Hershey's Milk Chocolate Bar- If you go for the full size bar, make sure you only use 3 squares. I made the mistake of using half of the bar on some of the s'mores this weekend and chocolate was oozing out everywhere (if you don't believe me, just go back and look at Mally's hands). I got my sister the miniature hershey bars which have four squares and so she was able to break them in half and place the squares side by side and said they were perfect.


Jet-Puffed StackerMallows- They are FLAT, SQUARE marshmallows; perfect for s'mores! So far, I've found them at Target and Lowe's Foods. They are fabulous but just a warning- they look small, but they puff up so you really only need one (even though before you microwave it, it looks like you need two... again, learn from my mistakes).

I hope that you bring in the summer season with a s'mores treat. I'm planning on making s'more brownies at some point this week... I just need to find someone who wants to help me eat them!


Monday, June 6, 2011

chocolate chip cake mix cookies

oh. my. goodness.

First of all, I'm sorry for my lack of posts. You see, two weeks ago my entire family decided to share the stomach bug. How thoughtful! Also, it is the end of the school year... this Friday is the last day! So, I've been busy preparing report cards, cleaning my room, organizing worksheets, picking out movies to watch, etc. It seemed as if I'd never do another post again... until tonight.

Was I planning on blogging about these cookies? No. In fact, I figured they would be something quick and easy to try but nothing to write home about. But, after the reaction of my husband, I figured I needed to share this recipe with you all. He is obsessed... and has already eaten 3.

You will not even believe how quick, easy and delicious these are. I found a recipe online and changed just a few things (I left out brown sugar, used a moist cake mix and went for mini chips instead of regular). I cannot find the recipe I used because I clicked on it from Pintrest on my phone... so I apologize for that! But, here is my adaptation:

Chocolate Chip Cake Mix Cookies


1 box yellow cake mix {I used Betty Crocker's super moist}
1 stick (1/2 cup) softened salted butter
2 eggs
1 tsp vanilla
1 package (~2 cups) mini chocolate chips

Preheat your oven to 350. Mix the cake mix, butter, eggs, and vanilla all together using an electric mixer. {I used a hand mixer and it got kind of difficult because the batter is very sticky, but it's not impossible. Next time I'll use the countertop mixer.} Then, fold in your chocolate chips using a spoon or spatula. Spoon your dough onto a cookie sheet {I use stoneware, but if you use metal, you may want to consider greasing it or putting down parchment paper.} Bake for 8-12 minutes {I waited until mine had a little golden color at the top to take them out.}


These cookies took less than an hour from start to finish to make 30+ cookies. I started off making larger cookies and then switched to smaller, more bite size.

The reason Ford kept going back for more? It was definitely the inside...


The cookies are very soft and chewy and by putting mini chips in them, they have more chocolate in them than if you used the regular size chip.

Just a final note, these cookies do NOT look like they are baking when they are first in the oven. After the first batch baked for close to 8 minutes, I checked on them and was so confused as to why they were still in balls. Finally, around the 8 minute mark, they started to take on a cookie shape, but they are still very fluffy, even when they are finished {I took them out around 12 minutes, but it will vary by oven.}

I am off to go put these in a container for Ford to take to work. I do not need these sitting around! In fact, just thinking about them now makes me want to go work out.

Let me know if you try making these and how much you love them... :)

Tuesday, May 17, 2011

meet corky {and my other quirks}


First things first, the reason behind this post is simple: I was given a "Stylish Blog Award" by my sweet friend Kim of Grin and "Barrett" {Click on the name to go check out her blog}. Kim and I grew up in church together and I absolutely love reading her blog. It is a peek inside her life and the things she enjoys doing; I especially love the posts where she talks about different products/recipes that she has tried. She is extremely domestic and such an inspiration to me!

The "rules" of this blog award are as follows:

1. Link back to the blog that gave you the award {see above}.

2. Share seven things about myself that you may not know {here it goes...}.


1. My husband and I have been dating since senior year of high school, but I have known him since middle school. Ford and I have completely different hobbies/interests, but somehow it works. He is always supportive of my painting and crafting and is always willing to lend a helping hand {think: putting wire on the back of the growth charts} but he'd much prefer to be outdoors rock climbing or camping. Just last weekend I sent him to Utah for a three-day trip with his best friends for his birthday.


2. Ford and I first started dating two weeks before Valentine's Day (talk about pressure- especially in high school!) so he took me to Build-a-Bear and we made a little stuffed dog that we named Corky. If you've ever been to Build-a-Bear, you know that you put a heart in the animal that you stuff. Well, Corky has two hearts, a red and white plaid one that I chose and a plain red one that Ford chose. Corky can always be found sitting on our bed with all the other pillows. We refer to him as our "love child." Ha!


3. Despite my love for creating artwork, our home has practically nothing on the walls. I have my bridal portrait in the dining room and a magnetic board in the kitchen, and that is it. You'd think I'd at least frame engagement/wedding pictures, but honestly I haven't had a chance. I'm constantly making things for other people and I would not have it any other way.

4. Speaking of my home, my favorite piece of furniture is our ottoman. It's probably my favorite because it's the first piece that we got together after getting married. I love the bold floral pattern and the bright colors. Not to mention, that awesome tray you see on top of it is from the lovely and talented Lydia of Vintage 2 Vogue. Love my sweet friend and wish she didn't live so far away.


5. I always have to make sure things are "perfect." It usually takes me two or three times to get the hang of something that I am doing. Typically, I don't post my first projects, but below you will see a picture of my first polka-dotted cookie back from the beginning of April that ended up being thrown out because I thought the icing was too bubbly. Also, the first time I made magnets I tried to paint them and the glaze was bubbly {I'm sensing a theme with the bubbles...}. Finally, at Wine & Design last week with Mary English, we painted the NC State University bell tower. Believe it or not, it was one of my first times painting a "real" object-- I'm not a fan. I'd rather do cutesy over real anyday.


6. I can make those bows you buy by the bag full at Christmas time. I even made one today. I made them out of magazine paper when I was babysitting a couple of months ago, but I wanted to see how it would work with just regular construction paper. I think it's pretty cute, but I may step it up a notch and try it with fabric before posting a "how-to."


7. I'm in the process of making cookies for Ford to take to work tomorrow. I have the worst habit of making dough and then forgetting about it until it's too late to use it. I also have an awful habit of eating my buttercream icing with a spoon... but that's another story. One thing you may have noticed when I post pictures of my cookies is that I bake them on aluminum foil. Is it some super awesome secret to make your cookies more delicious? No. In fact, they taste a thousand times better when baked directly on the stoneware... I'd just prefer less clean up :)


Last but not least, I'm awarding the "Stylish Blog Award" to the following blogs...

Side note: I realize this is a random post, and it's been over a week since I posted last, but we had end of grade testing and I've been exhausted! Luckily, I've had a few orders lately so I'm in the process of making personalized magnets, a growth chart, a framed silhouette, and cupcakes. All different projects, but I love being able to create the one-of-a-kind gifts for you to give and receive. I can't wait to post them as I finish them up!